Generating Excel Files in .NET
Using ClosedXML to make great exports.
Has it really been two months since I posted something? Shit. Ok, how about Excel? Everyone loves Excel! Right?
(crickets)
Whatever, Excel is important and useful.
And I recently had a project for work that required creating Excel files in code. It turned out pretty interesting. Now, I normally don’t like using Excel as an export format. CSV is way more neutral and easier to write (using CSVHelper) but those files get opened in Excel 99% of the time anyway. In this instance, Excel was a requirement and some formatting needed to be done so CSV wasn’t going to cut it.
I’ve only done Excel exports from .NET once before this recent project and it was a while ago. I think I used EPPlus, which seems to have changed it’s licensing terms since then and is now paid. So I set about looking for another library to help and found ClosedXML.
The name is a pun on the OpenXML spec. I love it.
Using ClosedXML is pretty straightforward:
using var wb = new XLWorkbook();
var ws = wb.AddWorksheet();

// Write some data
ws.Cell(1, 1).Value = "Some value";

// Save the file to disk or deliver it from an ASP.NET Core endpoint
wb.SaveAs("SomeFile.xlsx");
wb.Deliver("SomeFile.xlsx");
The documentation is pretty good and covers a lot of use cases and quirks. I want to show you a few things I found.
Keep It Relative
I did this because the app I’m working on has two exports that can optionally be done in a single file, but I think this is a good practice in general. In the class that creates the exports, I have this:
private (int Row, int Col) _origin = (1, 1);
I’m keeping an origin point (using a tuple) so that when I write to any cell, I can do it in a way that allows the entire export to be shifted around in the worksheet. The origin is the only fixed point and all cells are defined relative to it:
public void WriteHeaders(IXLWorksheet ws)
{
    ws.Cell(_origin.Row, _origin.Col + 0).Value = "header 1";
    ws.Cell(_origin.Row, _origin.Col + 1).Value = "header 2";
    ws.Cell(_origin.Row, _origin.Col + 2).Value = "header 3";
    ws.Cell(_origin.Row, _origin.Col + 3).Value = "header 4";
    ws.Cell(_origin.Row, _origin.Col + 4).Value = "header 5";
}
This also helps cover up the fact that cells are 1-indexed. I like to treat the worksheet like a big 2d array and using the origin helps a lot with that. There are helper functions provided that can get the first/last used row/column/cell, but I found the origin point method a lot easier to work with.
Writing DateOnly
.NET 6 introduced some new types for DateOnly and TimeOnly. They are incredibly useful for date/time work where you only need one part. For instance, the app I’m building uses DateOnly a lot in the database model (to map to SQL Server date columns). Time just isn’t important here.
But ClosedXML falls over itself if you try to write a DateOnly value to a cell. The solution to this is quite simple: convert it to a DateTime:
ws.Cell(row, _origin.Col).Value = someDateOnlyValue.ToDateTime(TimeOnly.MinValue);
ClosedXML can handle DateTime values and Excel is (in this case) smart enough to auto-format that date without a time.
Using Accent Colors
The last thing I want to point out is part of the reason I needed an Excel library in the first place: formatting. Depending on the value I’m exporting, the cell may need to be highlighted in a certain way. ClosedXML has lots of ways to handle colors, but I wanted this to match an existing file that the client was using. That file used a standard Excel accent color, which ClosedXML provides a nice API for:
var cell = ws.Cell(row, col);

cell.Value = someValue;

if (shouldHighlight)
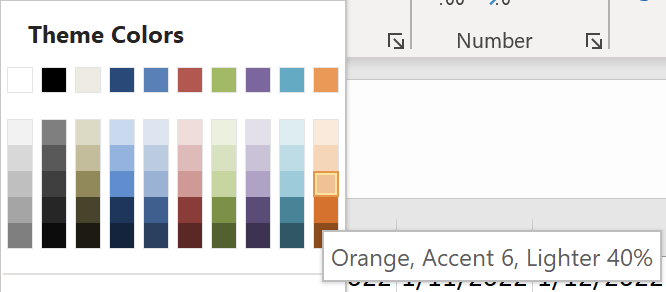
    cell.Style.Fill.BackgroundColor = XLColor.FromTheme(XLThemeColor.Accent6, 0.4); // Even the tint!
That matches the color and tint from the normal Excel color picker:

A nice short post about something small but helpful. That’s what I need to write more of. I think I can come up with some more of those. Hopefully I won’t wait another couple of months before the next one.
Photo by Mika Baumeister on Unsplash